Quick overview
The Procreate animation basics
Turn on Animation Assist, make each frame as a layer or a group of layers, adjust timing with onion skins and Hold Duration, then choose a playback mode and export format.
1. Turn on Animation Assist
Procreate animation starts with Animation Assist. Open the wrench menu, go to Canvas, and turn on Animation Assist. This adds a timeline at the bottom of the screen with playback, settings, and frame controls.
Animation Assist is not a separate app like Procreate Dreams. It is a lightweight frame-by-frame tool built into regular Procreate, which makes it great for simple motion tests, looping GIFs, hand-drawn effects, and short animated illustrations.

Here’s the numbers
Procreate animation settings to keep nearby
These are the practical Animation Assist controls from the video and how to think about them while building a simple frame-by-frame animation.
Wrench > Canvas > Animation Assist to show the frame timeline.3 or 4 onion skin frames for context, then lower opacity if the guides get distracting.Loop repeats, One Shot plays once, and Ping Pong plays forward then backward.12 fps is a useful starting point. Raising the frame rate plays the same drawings faster; add drawings or adjust holds if you want to keep the same duration.GIF for quick loops, MP4 for video sharing, and image sequences when moving into other apps.2. Understand that frames are layers
In Procreate, each animation frame is also a layer. The timeline is essentially your layer stack turned sideways, which is a helpful way to understand what is happening when you add, select, or edit frames.
The first and last frames can become special background or foreground layers. A background stays behind every frame, while a foreground can sit above the moving artwork. That is useful when you want scenery, guides, or overlays to remain consistent.

3. Use onion skins and hold duration for readable motion
Onion skins show nearby frames as transparent guides so you can see how far the drawing is moving. More onion skin frames gives you more context, while fewer frames keeps the screen cleaner.
Hold duration lets one drawing stay on screen for multiple frames. This is important because not every animation needs a new drawing every single frame. Holds create pauses, accents, and readable timing without forcing unnecessary redraws.

4. Choose playback and export settings intentionally
Procreate can play animations as a loop, ping-pong, or one-shot. A loop repeats from the beginning, ping-pong plays forward and backward, and one-shot plays once. The right setting depends on whether the animation should feel continuous or like a finished action.
When you are ready to share, export as an animated GIF, MP4, PNG sequence, or another supported format based on where it will live. GIFs are easy for small loops, while MP4 is usually better for video platforms and cleaner playback.

Start with a simple bounce animation
This Iceberg animation is a fun spin I made on the traditional bouncing-ball exercise. Yours doesn’t need ripples or any other extra effects. Start with something simple, like a ball or a square moving and bouncing, to get a feel for spacing and timing. Once you get the hang of it, you can add your own twist.
Try a motion study from the finished example
- Pick one moving shape. Ignore the background detail at first. Sketch the important poses where the action changes direction or the shape changes most.
- Compare spacing and shape. Notice where positions are close together and where the movement covers more distance. Keep the study rough so you can concentrate on the bounce and exaggeration.
- Test your own timing. In regular Procreate, turn on Animation Assist and put each drawing on a separate layer or group. Start at 12 fps as a practice setting, then adjust the drawings, spacing, or holds until the motion reads clearly. This is a suggested exercise setting, not a claim about the original project.
For another step-by-step lesson using frame-by-frame animation in Procreate, continue with the water-animation walkthrough. The same principles apply, and the more projects you practice with, the more natural these tools will feel.
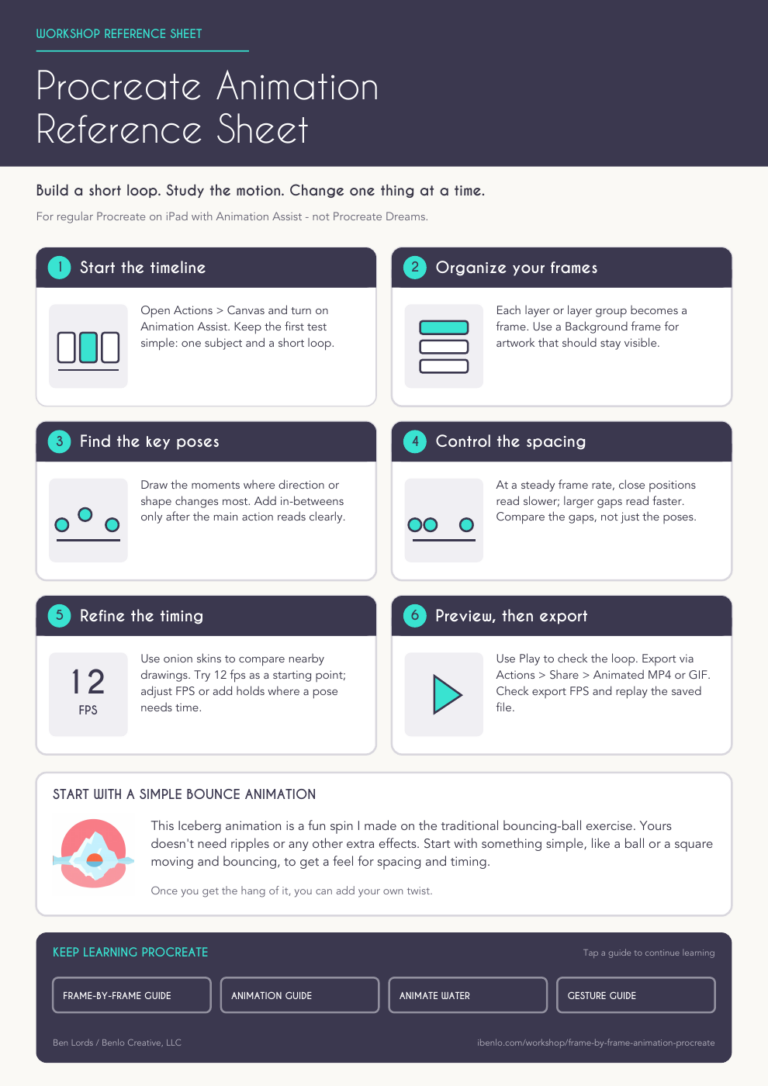
Download the Procreate Animation Assist Reference Sheet
A one-page illustrated companion for Animation Assist, spacing, timing, and a simple bounce exercise.
When Animation Assist Is Enough and When to Move to Another App
Animation Assist is a good fit for short loops, timing studies, hand-drawn effects, and early motion ideas. Spacing controls speed, holds create emphasis, and onion skins show how far each drawing has moved. You can learn those fundamentals without leaving Procreate.
A complicated scene with many moving parts will outgrow this timeline. Once the movement works, export a GIF, MP4, animated PNG, HEVC file, or image sequence and continue in another app when the project needs deeper compositing or editing control.
Keep learning Procreate
Use the water lesson to practice spacing and timing, keep the gesture guide nearby for canvas and layer shortcuts, or return to the beginner guide for a broader Procreate refresher.
 Video + Guide
How to Animate Water in Procreate With Frame-by-Frame Timing
A frame-by-frame Procreate water animation guide covering timing, spacing, squash and stretch, droplets, and final shading polish.
Video + Guide
How to Animate Water in Procreate With Frame-by-Frame Timing
A frame-by-frame Procreate water animation guide covering timing, spacing, squash and stretch, droplets, and final shading polish.
 Video + Guide
Procreate Touch Shortcuts and Gestures: Cheat Sheet
Learn Procreate touch shortcuts for undo, redo, layers, Alpha Lock, and QuickShape, with an illustrated gesture cheat sheet to keep nearby.
Video + Guide
Procreate Touch Shortcuts and Gestures: Cheat Sheet
Learn Procreate touch shortcuts for undo, redo, layers, Alpha Lock, and QuickShape, with an illustrated gesture cheat sheet to keep nearby.
 Video + Guide
How to Use Procreate: A Beginner’s Guide
Start drawing in Procreate with a guide to canvas setup, brushes, layers, selections, masks, and gestures, then choose what to practice next.
Video + Guide
How to Use Procreate: A Beginner’s Guide
Start drawing in Procreate with a guide to canvas setup, brushes, layers, selections, masks, and gestures, then choose what to practice next.
Procreate Animation Questions
01Can you animate in regular Procreate?
Yes. Turn on Animation Assist in the Canvas settings to create frame-by-frame animation inside regular Procreate.
02Are Procreate animation frames layers?
Usually. A timeline frame can be a single layer or a group of layers, which is useful when one drawing needs several editable parts.
03What is onion skinning in Procreate?
Onion skinning shows nearby frames as transparent guides so you can draw the next frame with better spacing and timing.
04Is frame-by-frame animation in Procreate hand-drawn?
Yes. If you draw the changing poses yourself in Procreate, you’re making hand-drawn digital animation. Using an iPad instead of paper doesn’t change that. Animation Assist plays your frames and shows onion skins; it doesn’t draw the in-between poses for you. You can hold or reuse a drawing without making a new one for every playback frame.