
Quick overview
How to use the Pen Tool in Illustrator
Press P, click to place corner points for straight lines, and click-drag to create smooth points with direction handles. Hold Option on Mac or Alt on Windows when a curve needs to turn into a sharp corner. Use Command or Control while drawing to move a point without leaving the Pen Tool.
The Pen Tool is precise, but it is not especially interested in feeling friendly the first time you use it. The trick is to stop treating every anchor point like a tiny puzzle. Place the fewest points you need, use the handles to control the path between them, and adjust the rough shape after it exists.
I am using Adobe Illustrator here, but the same basic relationship between points, handles, and curves carries into many other vector design programs. Once that relationship makes sense, the Pen Tool stops feeling like a sequence of guesses.
1. Click to draw straight lines
Select the Pen Tool or press P. Click once to create the first anchor point, move the cursor, and click again. Illustrator connects the two corner points with a straight segment.
Continue clicking to build a path. To close a shape, move back over the first point and click when the small circle appears beside the cursor. If the path should remain open, press Escape or switch tools.
Do not add a point every few pixels. A straight segment only needs a point where it begins and another where it ends. Extra points make a path harder to revise later without improving the line.
2. Click and drag to draw curves
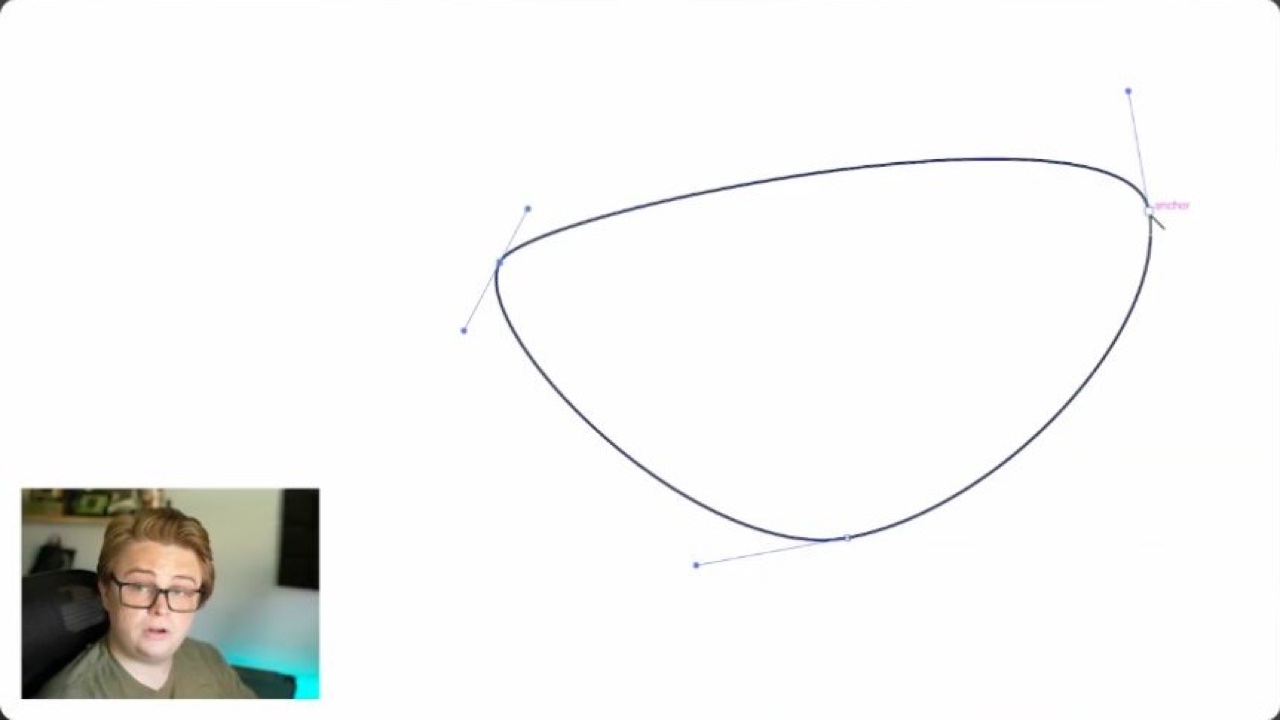
For a curve, click and drag instead of releasing immediately. This creates a smooth anchor point with direction handles. The angle of the handles controls the direction of the curve, while their length controls how strongly the path bends.
Move to the next point and drag again. You are shaping the segment between the anchors, not drawing the outline with the cursor. That is why a clean curve can often use fewer points than expected.
Longer handles create a broader curve. Shorter handles keep the bend closer to the point. If the curve looks lumpy, first try moving or shortening a handle before adding another anchor.
3. Break the handles when the direction changes
A smooth point normally keeps both handles aligned. That works when a curve passes through the point without an abrupt change in direction. It does not work as well for the peak of a mountain, the point of a leaf, or any place where one curve should leave at a different angle.
Hold Option on Mac or Alt on Windows and drag a handle to separate it from the other side. You can now aim each handle independently. One side can remain curved while the next side leaves as a sharp turn.
While you are still drawing, hold Command on Mac or Control on Windows to temporarily use Direct Selection. Move the current point or adjust a handle, then release the key to return to the Pen Tool.
Quick reference
Illustrator path shortcuts worth remembering
- P
- Select the Pen Tool.
- Shift + C
- Select the Anchor Point Tool.
- Option / Alt
- Break or redirect handles while drawing and editing.
- Command / Control
- Temporarily access selection while the Pen Tool is active.
- Command / Control + J
- Join selected endpoints.
- + and –
- Add or remove anchor points.
- Shift + E
- Select the Eraser Tool to cut through paths and shapes.
- N
- Select the Pencil Tool for freehand paths.
4. Refine the rough path with the Anchor Point Tool
Press Shift + C for the Anchor Point Tool. Drag from a corner point to add handles and turn it into a smooth point. Click a smooth point to remove its handles and make it a corner. Drag one handle when you need the two sides to move independently.
This is often easier than trying to draw the finished shape perfectly on the first pass. Place the important points, close the path, and then decide which corners need to stay sharp and which should soften.
For a mountain shape, for example, the valleys may need hard direction changes while the peaks look better with a slight curve. The Anchor Point Tool lets you make those decisions after the overall silhouette is already visible.
5. Join paths and clean up anchor points
To join two open paths, select their endpoints with Direct Selection and press Command + J on Mac or Control + J on Windows. Illustrator connects the selected ends. If the points are not on top of each other, it adds a segment between them.
Press + to add an anchor point where the path needs another controlled change. Press – to remove a point. Removing unnecessary points often makes a curve easier to smooth because fewer handles are competing with each other.
The Eraser Tool, Shift + E, can cut through a shape or path. Afterward, use Direct Selection to remove the pieces you do not need and join any endpoints that should become one continuous path.
Pen Tool alternatives
Pen, Curvature, or Pencil?
The first five steps cover the Pen Tool workflow. The Curvature and Pencil tools below are alternatives for times when direct handle control is more work than the shape needs.
- Pen Tool
- Use it when point placement and curve direction need precise control.
- Curvature Tool
- Use it for smooth shapes when you would rather move points than manage handles.
- Pencil Tool
- Use it for freehand paths, tablet drawing, and fast organic shapes.
6. Use the Curvature Tool when you want curves without managing every handle
The Curvature Tool creates smooth curves as you place points. It is a useful alternative when the Pen Tool handles are getting in the way of the shape you are trying to see.
Click to add points and let Illustrator calculate the curve between them. Double-click a point when the next segment should be straight, then continue clicking normally to return to curved segments. You can also drag existing points directly to reshape the path.
The Curvature Tool is not a lesser version of the Pen Tool. It is a different way to describe the same kind of vector path. Use it when you want to think about the position of the curve more than the geometry of its handles.
7. Use the Pencil Tool when drawing feels more natural
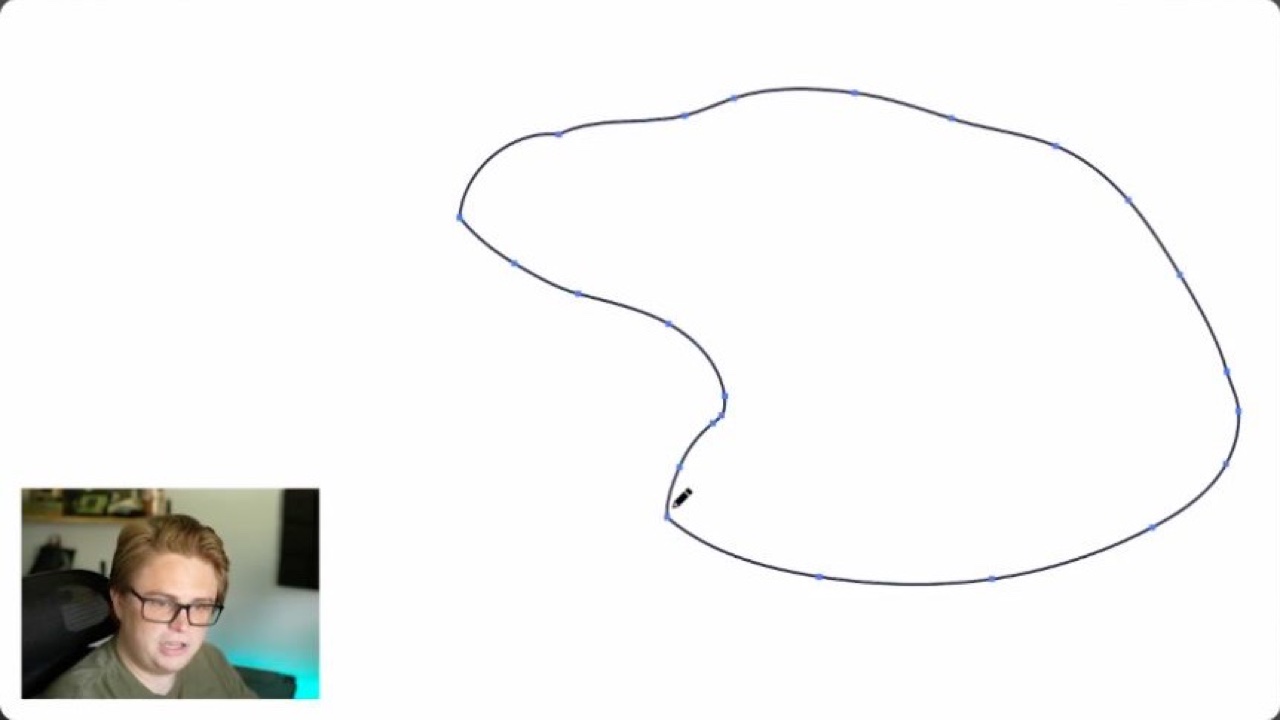
Press N for the Pencil Tool and draw the path freehand. Illustrator smooths the cursor movement and places anchor points along the result. This can feel much more natural with a drawing tablet, especially for loose organic shapes.
Double-click the Pencil Tool to open its options. Fidelity controls how closely the path follows your hand. A smoother setting usually creates fewer points, while a more accurate setting follows smaller movements and can leave a busier path.
Keep a selected Pencil path active and draw over part of it to reshape that section. If the option is enabled, hold Option or Alt to switch temporarily to the Smooth Tool. Paint over a rough area to simplify it, or click once to smooth the selected path more broadly.
The Pencil Tool is faster and more physical, but it rarely creates the same tidy point structure as a carefully drawn Pen path. That is fine when the shape looks right and does not need exact technical control.
8. Practice the motion, not just the finished shape
The Pen Tool becomes easier through repetition. The same click, drag, and handle logic appears in Illustrator, Photoshop, After Effects, Figma, and other design tools, so the time spent learning it travels well.
The Bézier Game is a useful place to practice outside Illustrator. It asks you to trace shapes with a limited number of points, which makes the relationship between point placement and handle direction easier to see.
Do not chase the lowest possible point count immediately. First make the shape work. Then try again with fewer points and cleaner handles. Precision is useful. Fighting the tool for a perfect score is not.
More Illustrator tutorials
Continue with practical workflow shortcuts, build a reusable pattern brush, add comic-style shading, or fix a Perspective Grid that has taken over the document.
 Video + Guide
5 Illustrator Workflow Tips for Faster Vector Design
Five less-common Illustrator workflow tips for faster vector drawing, cleaner paths, repeated transforms, and better layer control.
Video + Guide
5 Illustrator Workflow Tips for Faster Vector Design
Five less-common Illustrator workflow tips for faster vector drawing, cleaner paths, repeated transforms, and better layer control.
 Video + Guide
How to Create Custom Pattern Brushes in Illustrator
Create custom Illustrator pattern brushes for repeating artwork, character details, decorative borders, and paths that need to follow a drawn shape.
Video + Guide
How to Create Custom Pattern Brushes in Illustrator
Create custom Illustrator pattern brushes for repeating artwork, character details, decorative borders, and paths that need to follow a drawn shape.
 Video + Guide
3 Comic-Style Shading Techniques in Illustrator
Create comic-style shading in Illustrator with pixel halftones, classic dot halftones, and editable blended line shading using built-in effects and vector tools.
Video + Guide
3 Comic-Style Shading Techniques in Illustrator
Create comic-style shading in Illustrator with pixel halftones, classic dot halftones, and editable blended line shading using built-in effects and vector tools.
 Video + Guide
How to Turn Off the Perspective Grid in Illustrator
The fast fix for hiding Illustrator’s Perspective Grid when it appears by accident, including the Shift + P shortcut, the close X, and the menu fallback.
Video + Guide
How to Turn Off the Perspective Grid in Illustrator
The fast fix for hiding Illustrator’s Perspective Grid when it appears by accident, including the Shift + P shortcut, the close X, and the menu fallback.
Illustrator Pen Tool questions
01How do I make a straight line with the Pen Tool in Illustrator?
Press P, click once for the first anchor point, then click again where the straight segment should end. Continue clicking for more straight segments.
02How do I make a curve with the Pen Tool?
Click and drag to create a smooth point with direction handles. The handle angle sets the direction of the curve, and its length controls how strongly the path bends.
03How do I make a sharp corner after a curve?
Hold Option on Mac or Alt on Windows and drag the outgoing handle. This breaks the paired handles so the next segment can leave the anchor at a different angle.
04What is the difference between the Pen Tool and Curvature Tool?
The Pen Tool gives direct control over anchor points and direction handles. The Curvature Tool calculates smooth curves as you place and move points, so it can be easier when you do not want to manage each handle.
05When should I use the Pencil Tool instead?
Use the Pencil Tool when you want to draw a path freehand, especially with a tablet. It is faster for loose organic shapes, although the result may contain more anchor points than a Pen path.
06Why does my Illustrator curve look bumpy?
Too many anchor points are a common cause. Remove unnecessary points, move the remaining anchors to important changes in direction, and adjust the handle angle and length before adding another point.